
Affiliate links may be used in this post. Ordering through these links may result in a commission, which helps pay for the cost of running this site and keeps the content free.
At the beginning of the summer I knew I was going to need some assistance when traveling with a two and a half year old and a few month old baby. That is why I created 10 Toddler Busy Bags For Travel. My toddler, Miss M, enjoyed the busy bags so much we ended up sticking on in the diaper bag for times that she needed something to entertain her. I even ended up sticking the bucket full of busy bags in the baby’s nursery for the toddler to have something to do as I nursed. The busy bags were a hit! Miss M had played with the busy bags enough that it was time to create some new ones!
Having these activities in pencil bags make them easy to transport during travels. Using the pencil bags also allows Miss M to open and close them primarily by herself. They are easy to throw in a bag and small enough to have out in tight places like an airplane. I put the activities from the first ten busy bags I made into ziplock bags to store and reused the pencils bags.

7 More Toddler Busy Bags For Travel

1.Stick Number Match: Label library pockets with numbers. Provide enough sticks where all pockets can be filled at the same time. I started with single digits on the right side of the sticker so I could easily add a one in front to turn them into teen numbers.
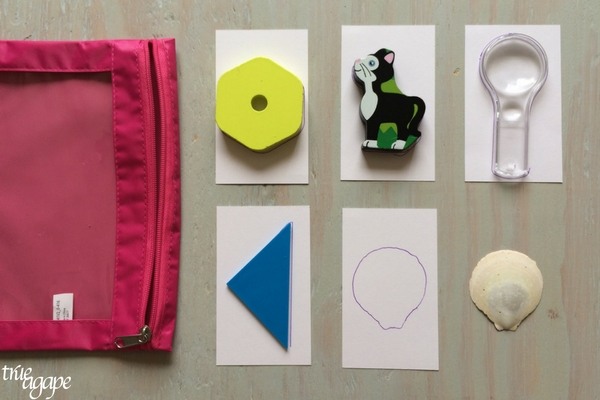
2.Tracing Object Match: Find several flat objects around your house. Make sure they all fit into the pencil bag. Trace the flat objects onto heavy weight index cards.

3. Calendar Puzzles: Use the pictures of old wall calendars to make puzzles. I cut up the picture then put the same number on all puzzle pieces and the ziplock baggie that it does in. All six pieces of this puzzle has the number one on the back along with the baggie it goes in. You can also see bag number four still in the pencil bag. I chose to put four puzzles in the bag. Numbering in this way allows the child to clean up independently if they get mixed up.
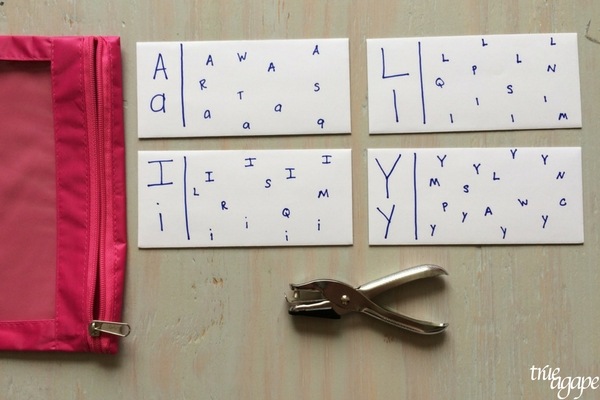
4. Hole Punch Letters: Write the capital and lower case letter to the left side of sturdy paper. Then write those letters along with other letters all around the card. Your child will find the letters that match the letter on the left and place a hole punch over it. There are even fun shaped hole punches! I chose to do letters in Miss M’s name that she still gets to practice. Keep in mind a longer narrow paper works better as the hole puncher will not reach the middle if it is a wide paper.

5.Paint Sample Puzzles: Simply cut paint samples. Make the number of pieces and cuts as simple or complex that is needed for your child.

6.Cutting Skills: On sturdy paper draw a large dot and lines. The dot indicates where to stop cutting. Start with straight lines then add zig zags to make it more challenging. Starting with training scissors makes it a little easier for the toddler to be able to do it on their own.
(I didn’t think about this and figured it out afterwards. There are such things as left and right handed scissors! If you have a lefty make sure to get left handed scissors!)

7.Shape Building: Cut our shapes on paper that have straight lines. Then, cut wood sticks to match each side of the shape. In this activity I used the matching numbers again to support Miss M in knowing what sticks go to which shapes. You can see this with the square. The square has four dots and so do the wood sticks that create the square.
These 7 toddler busy bags for travel will keep your kiddo busy and learning, but also help you stay stress free while you are traveling this summer! The thing I love about busy bags is that fact that you can make them as easy or challenging as you would like. Need your toddler to be able to do the activities on their own? Go on the easier side. Going to have time next to your toddler on the plane? Make them a little more challenging while you can support them. This is also the case for the first 10 toddler busy bags for travel I created.
Still looking for more toddler busy bag ideas? You might be interested in this book that I found. It has 52 more ideas!

Until Next Time- Truly Love,
Cassie

As a left-handed person I wouldn’t recommend automatically getting left-handed scissors for your child. I had teachers giving me left handed scissors and I just couldn’t do it. Learning to cut right handed means I don’t need special scissors for that rest of my life. I love being left handed, but we do live in a right handed world. Some things are best learned right handed!